
Custom Protein Powder Mix Generator – How To Guide

Making your own protein shakes with TrueNutrition.com is quick and easy. Whether you’re looking for a pre-workout or post-workout boost, a meal-replacement, or even a vegan alternative to other protein mixes. You can create exactly what you want, for the price you want. And since you’re choosing the ingredients, you know exactly what’s in it and can make the best custom protein powder mix for you. So let’s get started.
1. Getting Started

First, let’s identify the various tools you have at your disposal. At the upper left of the Custom Protein Powder Generator is the Information Box, which displays helpful hints and information about the various ingredients you can choose from.
To view information about a specific ingredient, click on the blue “i” to the left of each ingredient. Information displayed includes “source,” “taste,” “mixabilty,” and other helpful notes.
2. Keeping Track

To the right of the information box is a pie chart, labeled My Mix Progress, that shows progress towards completion of your mix. Proteins will be blue on this chart, and carbs and fats will be red. Use this to keep track of the total percentage of each ingredient that you have selected.
If you try to select more than 100% total, the custom generator will automatically round down the last selected ingredient, and you will receive a pop-up box stating that “you have reached a custom mix of ingredients totaling 100%.” For example, if you select 50% whey protein, then attempt to select 75% milk protein, the application will automatically change your selection to 50% milk protein to prevent your total from exceeding 100%. You can then decrease the percentages of either or both ingredients in order to continue adding additional ingredients.
3. Pricing Your Custom Protein Mix
 Next, at the upper right of the screen, is the Order Quantity, the Mix Price, and the Add to Cart button, which will take you to the check out screen where you can review and pay for your order. The default order quantity is 1lb. To change this, click on the drop down menu and select a different quantity – from 1 to 100 pounds. The mix price will change automatically.
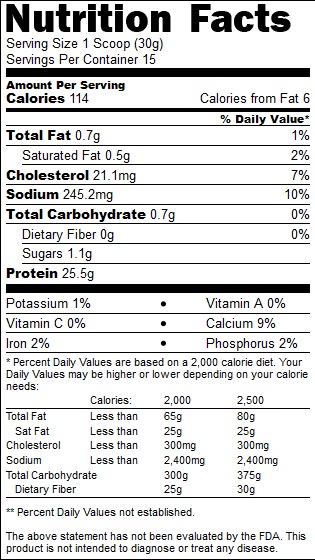
4. Nutrition Breakdown
Below the Mix Price etc, is the nutrition information box. This is updated automatically to reflect your selection of ingredients as you make your custom protein powerder mix. This box, labeled Nutrition Facts, looks exactly like one you would see on the side of a regular product, and you should read it the same way.
It’s a really neat feature as it’s easy to tell when you got something wrong. If there’s a bunch of carbs in there that you weren’t expecting then you probably added the wrong ingredient and need to make a change,
5. Overall Approach
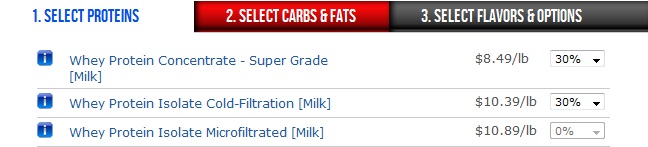 Finally, in the center of your screen is main menu. At the top of this section are three tabs, labeled Select Proteins, Select Carbs & Fats, and Select Flavors & Options. Use these tabs to change the ingredient options.
Below the three tabs is a list of ingredients you may choose from in the construction your custom mix. The name of the ingredient will be listed to the left and its unit price will be listed to the right. To the right of the unit price is a drop down menu that allows you to select the percentage of this ingredient you would like to include in your custom mix. The percentages increase in units of 5, and you may select any number from 0 to 100. 0% is the default – this means that there is none of the ingredient in your mix. 100% means that your mix is composed entirely of this ingredient, and there is no room left to add other ingredients.
6. Creating Your Custom Protein Mix
To begin your custom mix, start with the first tab, Select Proteins. Select your desired ingredients from this list by choosing the desired concentration of each ingredient from its drop down menu.
Next, click the Select Carbs & Fats tab, and add any of these ingredients that you wish, until your total reaches 100%. (Don’t forget to use the My Mix Progress chart to keep track of your progress, as well as to compare the ratio of proteins to carbs and fats in your mix.)
Lastly, click the Select Flavors & Options tab. Here, you can select various flavorings and sweeteners and even change the packaging your protein mix will arrive in. Click on the drop down menu under Flavors. As you can see, there are plenty to choose from. Select one of the “unsweetened” options for a milder flavor, that will allow you a choice of any sweetener. For a wider variety of flavors, select a “premium” option – these are naturally and artificially flavored and sweetened, and include diverse flavors such as “cinnabun,” “key lime pie,” and many others. Or, select one of the “natural premium” options for the best of both worlds – these are naturally flavored and sweetened with Stevia. There are also three options beneath the Flavors drop down menu that allow you to select your desired flavor intensity, light (1/2), normal, or heavy (2x).
Next, click on the drop down menu labeled Sweeteners, and select the sweetener of your choice. If you’ve selected a premium, pre-sweetened flavor, you must select “**Premium Flavor** (Pre-Sweetened)” from this menu. If you’ve chosen a natural premium flavor, you must select “Stevia (All-Natural Sweetener).” If you’ve selected an unsweetened flavor, you may select any of the sweetening options, or leave it unsweetened.
Finally, select your packaging of choice under the Packaging drop down menu, either an EZ-Seal upright Mylar bag, or a plastic jug with a free scoop.
Now, simply check the My Mix Progress chart to make sure you’re at 100%, then, at the right of your screen, review your Order Quantity, Nutrition Facts, and Mix Price (this is your sub-total – shipping and tax will be calculated during checkout). Once you’re satisfied, click the Add to Cart button to begin the check out process. (On the next screen, be sure to use the code: sgs811 to get a 5% discount.)
7. Suggested Recipes For Custom Mixes
Now that you’re familiar with the Custom Protein Powder Generator, here are a few recipes to get you started. Feel free to fine-tune them to your exact specifications or start from scratch. You can finish them all with your own preference of flavors and sweeteners.
Meal-Replacement Mix
- PeptoPro Hydrolyzed Caseinate [Milk] 30%
- Beef Protein Isolate 30%
- Premium Rice Protein Concentrate 30%
- Whole Egg Protein 10%
Vegan Protein Shake
- Gemma Pea Protein 25%
- Hemp Protein Isolate 50%
- Premium Rice Protein Concentrate 25%
Slow-Release Nighttime Mix
- Whey Protein Isolate Cold-Filtration [Milk] 50%
- Calcium Caseinate [Milk} 40%
- Micellar Casein [Milk] 10%
Post-Workout Mix
- Maltodextrin 50%
- Whey Protein Concentrate Super Grade [Milk] 35%
- Hydrolyzed Whey Protein High Grade [Milk] 10%
- Dextrose 5%
Got any combos/recipes you want to share? Add them in the comments section below.


")